'전체 글'에 해당되는 글 68건
- 2017.12.18 UE_LOG 액터의 name 출력하기.
- 2017.11.24 Landscape Grass Output
- 2017.11.09 매터리얼에서 Texture Sample 제한을 피하는 방법 (UE4)
- 2017.11.07 Dynamic Texture in UE4
- 2017.11.01 C# 에서 PDF 파일 읽기
- 2017.10.20 Object Input (Houdini Engine)
- 2017.09.15 How to connect Unreal Engine 4 to local server via WebSocket using blueprints?
- 2017.09.12 UE4 source compile with visual studio 2017
- 2017.09.12 Visual Studio 에서 can not open source file 에러가 발생할 경우. 1
- 2017.09.06 ctrl + 클릭 으로 peek definition
- 2017.09.06 Working with PySide in Maya 1
- 2017.09.06 UE4 PluginBrowser 관련 부분
- 2013.09.04 Self-signed certificate 서버에 https 로 연결 할 시 no peer certificate 예외 상황
- 2013.08.07 Jquery에서 Resizable 이 제대로 되지 않을 경우.
- 2013.06.20 Android Studio 에서 UTF8 문제.
- 2012.12.05 Scaleform 용으로 Flash의 text 를 사용할 때 글자가 제대로 나오지 않는 경우 (폰트 문제)
- 2012.12.05 UDK Scaleform CLIK Tutorial
- 2012.12.04 Custom Menu In UDK (scaleform) Tutorial
- 2012.12.04 UDK Scaleform 개발을 위한 Flash 환경 설정
- 2012.12.02 UDK 카메라 시점 변환 관련
UE_LOG 액터의 name 출력하기.
{
    UE_LOG(LogClass, Log, TEXT("This a testing statement. %s"), *TheActor.GetName());
}
'UE4' 카테고리의 다른 글
| Landscape Grass Output (0) | 2017.11.24 |
|---|---|
| 매터리얼에서 Texture Sample 제한을 피하는 방법 (UE4) (0) | 2017.11.09 |
| Dynamic Texture in UE4 (0) | 2017.11.07 |
| Object Input (Houdini Engine) (0) | 2017.10.20 |
| How to connect Unreal Engine 4 to local server via WebSocket using blueprints? (0) | 2017.09.15 |
Landscape Grass Output
언리얼 엔진상에서 매터리얼을 만들고 Grass Output 노드를 만들어 연결 하게 되면
procedural grass 를 생성해 준다.
실제로 적용을 해보면 듬성듬성 비어서 보기 좋지 않은데
보기 좋을 정도로 할려면 여러가지 오브젝트들을 섞어서 빽빽하게 채워 넣어야 할 듯함.
판때기로 만들어진 스태틱 메쉬를 Grass Type 노드에 등록해서 사용하는 방법이라서
일반적은 스태틱 메쉬들도 가능하다. 실제 섞어서 쓰면 될 듯함.

언리얼 문서 링크는
https://docs.unrealengine.com/latest/INT/Engine/OpenWorldTools/Grass/QuickStart/3/
'UE4' 카테고리의 다른 글
| UE_LOG 액터의 name 출력하기. (0) | 2017.12.18 |
|---|---|
| 매터리얼에서 Texture Sample 제한을 피하는 방법 (UE4) (0) | 2017.11.09 |
| Dynamic Texture in UE4 (0) | 2017.11.07 |
| Object Input (Houdini Engine) (0) | 2017.10.20 |
| How to connect Unreal Engine 4 to local server via WebSocket using blueprints? (0) | 2017.09.15 |
매터리얼에서 Texture Sample 제한을 피하는 방법 (UE4)
https://forums.unrealengine.com/development-discussion/rendering/57394-texture-samplers-limitation-is-still-present-in-4-9

'UE4' 카테고리의 다른 글
| UE_LOG 액터의 name 출력하기. (0) | 2017.12.18 |
|---|---|
| Landscape Grass Output (0) | 2017.11.24 |
| Dynamic Texture in UE4 (0) | 2017.11.07 |
| Object Input (Houdini Engine) (0) | 2017.10.20 |
| How to connect Unreal Engine 4 to local server via WebSocket using blueprints? (0) | 2017.09.15 |
Dynamic Texture in UE4
마지막 페이지의 Write Texture Data 부분을 자세히 볼 것.
http://www.showmethatagain.com/2015/11/13/dynamic-textures-in-ue4/
'UE4' 카테고리의 다른 글
| Landscape Grass Output (0) | 2017.11.24 |
|---|---|
| 매터리얼에서 Texture Sample 제한을 피하는 방법 (UE4) (0) | 2017.11.09 |
| Object Input (Houdini Engine) (0) | 2017.10.20 |
| How to connect Unreal Engine 4 to local server via WebSocket using blueprints? (0) | 2017.09.15 |
| UE4 source compile with visual studio 2017 (0) | 2017.09.12 |
C# 에서 PDF 파일 읽기
오랜만에 다시 찾는
https://itextpdf.com/
Nuget 에서 바로 설치해서 사용할 것.
AI 파일도 읽을 수 있다~
Object Input (Houdini Engine)
Table of Contents
The plug-in supports various types of Inputs to send data to Houdini Assets. When geometries are connected as inputs, any changes made to them will be automatically pushed to the Houdini Asset, causing it to be evaluated and its output recooked.
Currently, Houdini Engine for Unreal supports the following input types:
Creating Inputs
There are two ways you can use to create an input to send data from Unreal to Houdini.
This can be acheived either by using regular Node Inputs for SOP-type assets, or by creating Object Path Inputs by exposing an Operator Path parameter on your asset.
Node Inputs
By design, SOPs have nodes connectors for passing geometries. This allows SOP type assets to also have node connectors for inputting geometries. Those inputs can be configured by changing the Minimum Inputs and Maximum Inputs values in the "Operator Type Properties" dialog of the assets.

All inputs created in this way will be listed in the Input Details Panel , and their names can be changed in the Input/Output tab of the "Operator Type Properties" dialog.
Object Path Inputs
Object Path Inputs are created from Operator Path parameters that accepts a path to a Houdini node. In order to input geometry, the Op Filter needs to be set either to "Any Object" or "Any SOP". When geometry is assigned to this parameter, Houdini Engine will create the appropriate Houdini nodes that will represent the input geometry. The asset can then use these nodes to access the geometry.
Although the Operator Path Parameter can be created manually, the simplest way to create one is to create an Object Merge SOP and expose its "Object (objpath)" parameter to the asset level. The geometry can then be accessed from the output of the Object Merge SOP, and will appear in unreal as an Input in the Parameter Details Panel.

These parameters will appear mixed with the asset's other parameters in the details panel, as Operator Path parameters are just a regular type of parameters, but they will have the same behavior as Node Inputs.

They can be used for both Object-type assets and SOP-type assets to input geometry, but it is more common to use Node Inputs connections directly for SOP-type assets. Unlike Node Inputs, it is not possible to set the Keep World Transform option on Object Path inputs.
For more details, please see Operator Path Parameters.
Setting A Default Input Type
By default, the input type will be set to geometry when you instantiate the HDA in Unreal.
You can set a different default input type by modifying the input name (for SOP inputs) or object path parameter label (for Object Path Inputs) so that it contains certain keywords:
- if the name contains the**curve**, the default input type will be a Curve Inputs
- if the name contains landscape, terrain or heightfield the default input type will be a Landscape Inputs
- if the name contains world or outliner the default input type will be a World Outliner Inputs
- if the name contains asset or hda, the default input type will be an Asset Inputs
- if none of the above condition is met, the default input type will be a Geometry Inputs
The default input type can be changed afterwards and will only be used on the first instantiation of the HDA.
Input Details Panel
If your asset has Node Inputs, the Houdini Inputs part of details panel of the asset will list them all in an Array. You can change Input Types by using the dropdown menu. The details panel will then update and allow you to modify this input type's options and parameters.
If your input is an Object Path Inputs, its details, options and parameters will be listed in the same way in the Houdini Parameters part of the details panel.

Keep World Transform
The Keep World Transform checkbox is present for all input types, and controls the way the geometry / asset's transform is marshalled from Unreal to Houdini. When geometry is marshalled to Houdini through an input, an Object Merge node is used to connect the asset and the geometry. For Node Inputs, the Object Merge node is automatically created by Houdini engine, and set up in the same way that an object merge is used for Object Path Inputs.
- If Keep World Transform is checked, the Object Merge used to connect the input will have its Transform parameter set to INTO_THIS_OBJECT, causing the marshalled geometry to use the Asset Actor's Unreal Transform in Houdini.
- If unchecked, the Object Merge's Transform parameter will be set to NONE, causing the geometry to ignore the Asset Actor's Unreal Transform in Houdini, treating the geometry as if it's at the origin.
To sum things up, if an asset actor is located at (10, 10, 10) in Unreal, the geometry's Transform will be (10, 10, 10) in Houdini if Keep World Transform is checked, or (0, 0, 0) if Keep World Transform is unchecked.
Pack Geometry Before Merging
The Pack Geometry Before Merging checkbox is available for geometry and world outliner inputs.
When checked, all the different meshes and objects in the input will be packed individually before being merged into your asset's input. This allow you to have each object available as a packed primitive in Houdini, making instancing and differentiating objects easier, but can cause some issues depending on the way your hda is set up ( for example, scattering points on a packed primitive will not work correctly ).
Input Types
Geometry Inputs
Geometry inputs are used to marshall geometry from Unreal assets to Houdini. To do so, you can either drag and drop an Unreal asset from the content browser onto it, or select one from the drop down menu.

When there is more than one geometry set as input, the geometries can be differentiated in the Digital Asset with the Unreal to Houdini attribute unreal_input_mesh_namewhich is created on the input geometry primitives.
You can add multiple geometry assets to the input by clicking on the + button. You can also insert, duplicate or delete geometry inputs by using the drop-down menu on the far right.

Each asset selected in a geometry input has its own Transform Offset. This transform offset allows you to translate, rotate and scale individually each asset in the input to compensate for unnormalized assets, misplaced pivot points etc...

The Keep World Transform checkbox controls the way the geometry's transform is used in Houdini.
Unreal geometry marshalled through a Geometry Input will contain the following Unreal to Houdini Attributes on their corresponding Houdini node:
- unreal_material
- unreal_face_smoothing_mask
- unreal_lightmap_resolution
- unreal_input_mesh_name
as well as these Standard Houdini Attributes :
- Point positions (P)
- Vertex normals (N)
- Vertex colors (Cd)
- UV sets (uv, uvX).
Asset Inputs
The Asset Input type allows you to connect a Houdini Asset to the input of another Houdini Asset. This is actually more efficient than just sending the geometry created by one asset to another input, as both Assets will be directly connected in Houdini.
The actor picker will display a list of all the Houdini Assets present in the world, allowing you to select which Houdini Asset you want to connect to the input. Just click on a Houdini Asset Actor in the list to use it as an input. The Houdini Asset Actor currently connected to the input will be displayed as the Current Actor on top of the Actor picker.
For now, only one Houdini Asset Actor can be connected to another via an Asset Input.

The Keep World Transform checkbox controls the way the asset's transform is used in Houdini.
Curve Inputs
Curve data can be marshalled from Unreal to Houdini using Curve Inputs. The details panel allows you to set up the parameters of the created Curve SOP that is connected to the input in Houdini:

- Primitive Type allows you to choose the curve type between
Polygon (linear),BezierandNURBS. - Method allows you to choose the way the curve's CV are used when using either Bezier or NURBS curves. If CVs is selected, the curve point will be treated as Control Vertices, so the NURBS and Bezier curves will not pass through them. If set to Breakpoints, Houdini will automatically calculate the appropriate Control Vertices so that Bezier and NURBS curves pass through the curve's control point. The Freehand method should be ignored in the Unreal plug-in.
- Close allows you to decide if the curve's last point should be connected to the curves first points.
Finally, the Keep World Transform checkbox controls the way the curve's transform is used in Houdini.
Curves that are handled with a Curve Input will have the following Standard Houdini Attributes set on their corresponding Houdini nodes:
- Position (P)
- Rotation (rot)
- Scale (scale)
For more details on how to edit the curve, please consult Curves
Landscape Inputs
As their name suggests, Landscape Inputs allow you to marshall landscape data to your asset's input.
The actor picker in the Details panel displays a list of all the Landscapes present in the world, allowing you to select the one you want to use as your asset's input. Just click on a Landscape in the list to use it as an input. For now, you can only use one Landscape per input. The current selection will be displayed on top of the Actor picker.

You can choose how you want the landscape data to be exported to Houdini. Landscape can be exported as :
- a heighfield: the landscape data will be converted to a heightfield 2D volume. All landscape layers will also be added as masks to the heightfield.
- a mesh: the landscape height values will be converted to a triangulated mesh. Landscape layers will not be sent to Houdini. This is the most costing option of the 3, as more data will be sent through Houdini Engine.
- Points: the landscape data will be sent to Houdini as points. Landscape layers will not be sent to Houdini.
If Export Selected Landscape Components Only is checked, only the currently selected Landscape Components will be exported to Houdini. If unchecked, the whole landscape will be marshalled.
- When sending only the selected landscape components, you have the option to Auto-select components in asset bounds. If enabled, when there is currently no component selected on the landscape, the plug-in will send the landscape components that are contained with the asset's bounding box.
When exporting to Mesh or Points, the following options are also available:
- if Export Landscape Materials is checked, the landscape's face and hole materials will be exported to Houdini.
- if Export Landscape Tile UV is checked, the landscape's UVs will be exported in a separate texture for each tile.
- if Export Landscape Normalized UVs is checked, the landscape's UV values will be exported in [0, 1]
- if Export Landscape Lighting is checked, the landscape's Lightmap information will be exported to Houdini.
- Export Landscape Curves is currently not implemented.
The Recommit Landscape button can be use to export the landscape data again. This is to be used if the landscape's data has changed, as Landscape Inputs do not automatically update Houdini after a change has been made to them.
Finally, the Keep World Transform checkbox controls the way the Landscape's transform is used in Houdini.
Unreal landscapes marshalled through a Landscape Input will contain the following Unreal to Houdini Attributes in their corresponding Houdini Node:
- unreal_input_mesh_name
- unreal_vertex_index
- unreal_lightmap_resolution
- unreal_lightmap_color
- unreal_material
- unreal_material_hole
as well as these Standard Houdini Attributes :
- Point positions (P)
- Point normals (N)
- UV coordinates (uv)
World Outliner Inputs
The World outliner inputs allow you to connect any Actor in the world to your Asset's input. To do so, press the Start Selection button, this will lock the details panel and allow you to select the Actors you wish to connect to your input. Once your selection is finished, just press the Use Current Selection button again. The current selection will be displayed under the button.

World outliner inputs also allow you to use an Unreal Spline Component as a curve input in Houdini. If an Actor with a Spline Component is selected, the Spline will be converted to a Curve SOP in Houdini. The Unreal Spline components will be resampled to linear curves, as their behavior cannot be reproduced 1:1 in Houdini. The spline's refined positions are sent as CVs to the corresponding Curve SOP in Houdini.
The Unreal Spline Resolution parameter allows you to choose the sample length used to resample and send these points to Houdini. The default value of 50 will extract a spline point every 50 cm in Unreal and marshall it to Houdini. If set to 0, only the spline's control point will be marshalled.
Please see Unreal Spline Components for more details.
The Keep World Transform checkbox controls the way the actor's transform is used in Houdini.
Unreal meshes marshalled through a World Outliner Input will contain the following Unreal to Houdini Attributes on their corresponding Houdini node:
- unreal_material
- unreal_face_smoothing_mask
- unreal_lightmap_resolution
- unreal_input_mesh_name
as well as these Standard Houdini Attributes :
- Point positions (P)
- Vertex normals (N)
- Vertex colors (Cd)
- UV sets (uv, uvX)
Unreal Spline Components marshalled through a World Outliner Input will have the following Standard Houdini Attributes set on their corresponding Houdini nodes:
- Position (P)
- Rotation (rot)
- Scale (scale)
'UE4' 카테고리의 다른 글
| 매터리얼에서 Texture Sample 제한을 피하는 방법 (UE4) (0) | 2017.11.09 |
|---|---|
| Dynamic Texture in UE4 (0) | 2017.11.07 |
| How to connect Unreal Engine 4 to local server via WebSocket using blueprints? (0) | 2017.09.15 |
| UE4 source compile with visual studio 2017 (0) | 2017.09.12 |
| Visual Studio 에서 can not open source file 에러가 발생할 경우. (1) | 2017.09.12 |
How to connect Unreal Engine 4 to local server via WebSocket using blueprints?
UE4 Editor 확장해서 툴을 만들려고 하다보니
이것저것 필요한 내용들 중에
에디터에서 소켓 열어서 대기 하고 있는거 관련으로 검색하다가
발견한 내용.
VaRest 플러그인이랑 같이 참조 할것.
https://medium.com/@slonorib/how-to-connect-unreal-engine-4-to-local-server-via-sockets-9d73fd180f0b
https://github.com/getnamo/socketio-client-ue4
소스 부분들을 참고 할것
'UE4' 카테고리의 다른 글
| Dynamic Texture in UE4 (0) | 2017.11.07 |
|---|---|
| Object Input (Houdini Engine) (0) | 2017.10.20 |
| UE4 source compile with visual studio 2017 (0) | 2017.09.12 |
| Visual Studio 에서 can not open source file 에러가 발생할 경우. (1) | 2017.09.12 |
| ctrl + 클릭 으로 peek definition (0) | 2017.09.06 |
UE4 source compile with visual studio 2017
generateprojectfilesbat-2017 명령을 통해서 visual studio 2017용 솔루션 파일을 생성한다.
https://answers.unrealengine.com/questions/596678/generateprojectfilesbat-2017-vs-2017-error.html

C2187 error 이 지속적으로 난다면.
https://answers.unrealengine.com/questions/688112/ue417-will-not-compile-with-new-153-update.html

'UE4' 카테고리의 다른 글
| Object Input (Houdini Engine) (0) | 2017.10.20 |
|---|---|
| How to connect Unreal Engine 4 to local server via WebSocket using blueprints? (0) | 2017.09.15 |
| Visual Studio 에서 can not open source file 에러가 발생할 경우. (1) | 2017.09.12 |
| ctrl + 클릭 으로 peek definition (0) | 2017.09.06 |
| UE4 PluginBrowser 관련 부분 (0) | 2017.09.06 |
Visual Studio 에서 can not open source file 에러가 발생할 경우.
UE4 소스 코드를 visual studio 에서 보고 있을 경우
대부분은 intellisense 를 통해서 기타 등등 많은 부분 참조하면서 보게 된다.

그러나 가끔 에러가 나기도 하는데 위와 같은 에러가 발생할 경우에는
intellisense 가 해당 파일을 찾지 못해서 생기는 경우다.
아마 기본적으로 많은 디렉토리를 포함하고 있지만.
Classes 등의 서브 폴더의 경우에는 포함 안된 경우가 많기 때문에
솔루션 -> 마우스 오른쪽 버튼 -> Property
NMake -> Intellisense -> include search path
이부분에 직접 지정해서 폴더를 추가해주면 찾는다.
https://answers.unrealengine.com/questions/182995/471-cant-open-source-file-1.html
'UE4' 카테고리의 다른 글
| Object Input (Houdini Engine) (0) | 2017.10.20 |
|---|---|
| How to connect Unreal Engine 4 to local server via WebSocket using blueprints? (0) | 2017.09.15 |
| UE4 source compile with visual studio 2017 (0) | 2017.09.12 |
| ctrl + 클릭 으로 peek definition (0) | 2017.09.06 |
| UE4 PluginBrowser 관련 부분 (0) | 2017.09.06 |
ctrl + 클릭 으로 peek definition

위의 그림처럼 컨트롤 + 클릭으로 해당 클래스 등의 정의 부분의 화면을 띄워주는 extension
visual studio 2015에서는
https://marketplace.visualstudio.com/items?itemName=VisualStudioProductTeam.ProductivityPowerTools2015
visual studio 2017에서는
https://marketplace.visualstudio.com/items?itemName=VisualStudioProductTeam.CtrlClickGoToDefinition
'UE4' 카테고리의 다른 글
| Object Input (Houdini Engine) (0) | 2017.10.20 |
|---|---|
| How to connect Unreal Engine 4 to local server via WebSocket using blueprints? (0) | 2017.09.15 |
| UE4 source compile with visual studio 2017 (0) | 2017.09.12 |
| Visual Studio 에서 can not open source file 에러가 발생할 경우. (1) | 2017.09.12 |
| UE4 PluginBrowser 관련 부분 (0) | 2017.09.06 |
Working with PySide in Maya
Working with PySide in Maya
Maya 2017부터 PySide2 로 변경되었다.
그리고 Houdini 도 PySide2로 변경됨.
UI부분은 무조건 PySide2로 할것.
UE4 PluginBrowser 관련 부분
UE4 PluginBrowser의 source 위치는
UnrealEngine\Engine\Plugins\Editor\PluginBrowser\Source\PluginBrowser
UI 부분 참고 예정.
'UE4' 카테고리의 다른 글
| Object Input (Houdini Engine) (0) | 2017.10.20 |
|---|---|
| How to connect Unreal Engine 4 to local server via WebSocket using blueprints? (0) | 2017.09.15 |
| UE4 source compile with visual studio 2017 (0) | 2017.09.12 |
| Visual Studio 에서 can not open source file 에러가 발생할 경우. (1) | 2017.09.12 |
| ctrl + 클릭 으로 peek definition (0) | 2017.09.06 |
self-sign 된 서버에 https 로 연결 할 시 no peer certificate 예외 상황을 해결 하기 위해서는
웹에서 연결 할 때 처럼 인증서를 믿을 수 있다고 해줘야 하는데
일반적인 소스에서는 계속 에러를 발생시킨다.
별 지랄을 다 한 결과 찾아낸 방법은 다음과 같다.
http://stackoverflow.com/questions/11573108/self-signed-certificate-and-loopj-for-android
여기를 참조.
다음 클래스를 추가하고.
import java.io.IOException;
import java.net.Socket;
import java.net.UnknownHostException;
import java.security.KeyManagementException;
import java.security.KeyStore;
import java.security.KeyStoreException;
import java.security.NoSuchAlgorithmException;
import java.security.UnrecoverableKeyException;
import java.security.cert.CertificateException;
import java.security.cert.X509Certificate;

import javax.net.ssl.SSLContext;
import javax.net.ssl.TrustManager;
import javax.net.ssl.X509TrustManager;

import org.apache.http.conn.ssl.SSLSocketFactory;
public class MySSLSocketFactory extends SSLSocketFactory {
    SSLContext sslContext = SSLContext.getInstance("TLS");

    public MySSLSocketFactory(KeyStore truststore) throws NoSuchAlgorithmException, KeyManagementException, KeyStoreException, UnrecoverableKeyException {
        super(truststore);

        TrustManager tm = new X509TrustManager() {
            public void checkClientTrusted(X509Certificate[] chain, String authType) throws CertificateException {
            }

            public void checkServerTrusted(X509Certificate[] chain, String authType) throws CertificateException {
            }

            public X509Certificate[] getAcceptedIssuers() {
                return null;
            }
        };

        sslContext.init(null, new TrustManager[] { tm }, null);
    }

    @Override
    public Socket createSocket(Socket socket, String host, int port, boolean autoClose) throws IOException, UnknownHostException {
        return sslContext.getSocketFactory().createSocket(socket, host, port, autoClose);
    }

    @Override
    public Socket createSocket() throws IOException {
        return sslContext.getSocketFactory().createSocket();
    }
}
다음과 같이 사용.
                HostnameVerifier hostnameVerifier = org.apache.http.conn.ssl.SSLSocketFactory.ALLOW_ALL_HOSTNAME_VERIFIER;

                DefaultHttpClient client = new DefaultHttpClient();
                SchemeRegistry registry = new SchemeRegistry();

                SSLSocketFactory sf = null;

                try {
                    KeyStore trustStore = KeyStore.getInstance(KeyStore.getDefaultType());
                    trustStore.load(null, null);
                    sf = new MySSLSocketFactory(trustStore);
                    sf.setHostnameVerifier(MySSLSocketFactory.ALLOW_ALL_HOSTNAME_VERIFIER);
//                    client.setSSLSocketFactory(sf);
                }
                catch (Exception e) {
                    e.printStackTrace();
                }
//                SSLSocketFactory socketFactory = SSLSocketFactory.getSocketFactory();
//                socketFactory.setHostnameVerifier((X509HostnameVerifier) hostnameVerifier);

                registry.register(new Scheme("https", sf, 443));
                SingleClientConnManager mgr = new SingleClientConnManager(client.getParams(), registry);
                DefaultHttpClient httpClient = new DefaultHttpClient(mgr, client.getParams());

                // Set verifier
                HttpsURLConnection.setDefaultHostnameVerifier(hostnameVerifier);

                //DefaultHttpClient httpClient = new DefaultHttpClient();

                HttpPost httpPost = new HttpPost(URL);
                httpPost.setEntity(new UrlEncodedFormEntity(post_params));

                HttpResponse httpResponse = httpClient.execute(httpPost);
                HttpEntity httpEntity = httpResponse.getEntity();
                is = httpEntity.getContent();
'OLD POSTS' 카테고리의 다른 글
| Jquery에서 Resizable 이 제대로 되지 않을 경우. (0) | 2013.08.07 |
|---|---|
| Android Studio 에서 UTF8 문제. (0) | 2013.06.20 |
| Scaleform 용으로 Flash의 text 를 사용할 때 글자가 제대로 나오지 않는 경우 (폰트 문제) (0) | 2012.12.05 |
| UDK Scaleform CLIK Tutorial (0) | 2012.12.05 |
| Custom Menu In UDK (scaleform) Tutorial (0) | 2012.12.04 |
Jquery에서 Resizable 이 제대로 되지 않을 경우.
draggable, resizable 를 동시에 여러개의 엘리먼트에 사용하는데
resizable이 되지 않는 문제가 있었다.
약 24시간 정도 지랄지랄 한 끝에 알아낸 것은.
resizable 이놈이 window.resize 이벤트를 발생한다.
windows.resize 이벤트는 이미 fit content 에 사용하고 있어서 계속 제대로 나오지 않는 것이었다.
http://stackoverflow.com/questions/7494378/jquery-ui-resizable-fire-window-resize-event
'OLD POSTS' 카테고리의 다른 글
| Self-signed certificate 서버에 https 로 연결 할 시 no peer certificate 예외 상황 (0) | 2013.09.04 |
|---|---|
| Android Studio 에서 UTF8 문제. (0) | 2013.06.20 |
| Scaleform 용으로 Flash의 text 를 사용할 때 글자가 제대로 나오지 않는 경우 (폰트 문제) (0) | 2012.12.05 |
| UDK Scaleform CLIK Tutorial (0) | 2012.12.05 |
| Custom Menu In UDK (scaleform) Tutorial (0) | 2012.12.04 |
Android Studio 에서 UTF8 문제.
Android Studio 에서 한글 메시지를 띄우는데 계속 에러가 나서 살펴보니.
새로 바뀐 컴파일 방법 때문에 에러인데.
build.gradle
파일에
tasks.withType(Compile) {
options.encoding = 'UTF-8'
}
이 부분을 추가 해주면 된다.
'OLD POSTS' 카테고리의 다른 글
| Self-signed certificate 서버에 https 로 연결 할 시 no peer certificate 예외 상황 (0) | 2013.09.04 |
|---|---|
| Jquery에서 Resizable 이 제대로 되지 않을 경우. (0) | 2013.08.07 |
| Scaleform 용으로 Flash의 text 를 사용할 때 글자가 제대로 나오지 않는 경우 (폰트 문제) (0) | 2012.12.05 |
| UDK Scaleform CLIK Tutorial (0) | 2012.12.05 |
| Custom Menu In UDK (scaleform) Tutorial (0) | 2012.12.04 |
Scaleform 용으로 Flash의 text 를 사용할 때 글자가 제대로 나오지 않는 경우 (폰트 문제)

위의 스샷처럼 Text 의 프로퍼티에서 embed 를 눌러서 원하는 폰트를 선택하고 Character ranges 를 반드시 체크해준다.
기본으로 체크가 안되어 있어서 한참 삽질을 해야했다.
그리고 Text의 프로퍼티에서 폰트 패밀리는 embedding 하는 폰트의 이름을 써줘야 한다. 그래야 제대로 나온다.
'OLD POSTS' 카테고리의 다른 글
| Jquery에서 Resizable 이 제대로 되지 않을 경우. (0) | 2013.08.07 |
|---|---|
| Android Studio 에서 UTF8 문제. (0) | 2013.06.20 |
| UDK Scaleform CLIK Tutorial (0) | 2012.12.05 |
| Custom Menu In UDK (scaleform) Tutorial (0) | 2012.12.04 |
| UDK Scaleform 개발을 위한 Flash 환경 설정 (0) | 2012.12.04 |
UDK Scaleform CLIK Tutorial
http://www.youtube.com/watch?v=_nsOOSBBbdg&feature=BFa&list=PL96C0C9E823647E76
UDK의 scaleform 에서 데이터 입력등을 위해서 컨트롤들을 사용할 일이 많은데 이런 경우에 쓸 수 있는게
CLIK 컨트롤들이다 눈여겨 볼것.
'OLD POSTS' 카테고리의 다른 글
| Android Studio 에서 UTF8 문제. (0) | 2013.06.20 |
|---|---|
| Scaleform 용으로 Flash의 text 를 사용할 때 글자가 제대로 나오지 않는 경우 (폰트 문제) (0) | 2012.12.05 |
| Custom Menu In UDK (scaleform) Tutorial (0) | 2012.12.04 |
| UDK Scaleform 개발을 위한 Flash 환경 설정 (0) | 2012.12.04 |
| UDK 카메라 시점 변환 관련 (0) | 2012.12.02 |
Custom Menu In UDK (scaleform) Tutorial
https://sites.google.com/site/tessaleetutorials/home/custom-menu-in-udk
Scaleform 관련 튜터리얼 중 하나 간략하게 잘 설명되어 있다.
'OLD POSTS' 카테고리의 다른 글
| Scaleform 용으로 Flash의 text 를 사용할 때 글자가 제대로 나오지 않는 경우 (폰트 문제) (0) | 2012.12.05 |
|---|---|
| UDK Scaleform CLIK Tutorial (0) | 2012.12.05 |
| UDK Scaleform 개발을 위한 Flash 환경 설정 (0) | 2012.12.04 |
| UDK 카메라 시점 변환 관련 (0) | 2012.12.02 |
| Perforce Server 유저 자동 생성 막기 (0) | 2012.11.28 |
UDK Scaleform 개발을 위한 Flash 환경 설정
http://udn.epicgames.com/Three/SettingUpScaleformGFx.html
Scaleform GFx Launcher
The Scaleform GFx Launcher is a tool provided by Scaleform to allow flash movies to be previewed in an environment that more closely matches that of an actual game than Flash's standard player.
Installing Scaleform GFx Launcher
Installing the Scaleform GFx launcher for Unreal Engine 3 development follows the standard process:
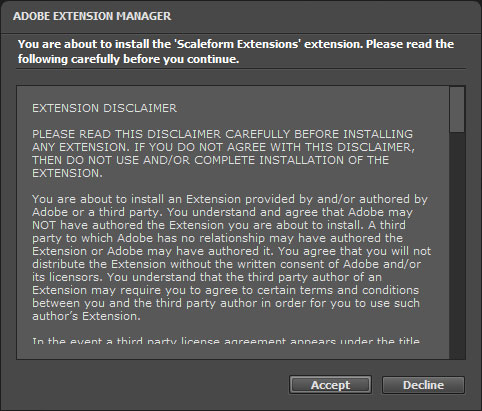
- In Adobe Flash Professional, go to Help > Manage Extensions to run the Adobe Extension Manager.
- At the top-right of the Launcher, click the Install button.
- In the file browser that opens, navigate to
[UE3Directory]\Binaries\GFx\CLIK Tools. and choose theScaleform CLIK.mxpfile. - You will need to agree to the license on the dialog that opens.
- A dialog will then appear showing the installation was successful.
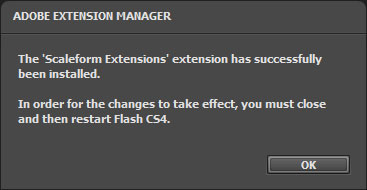
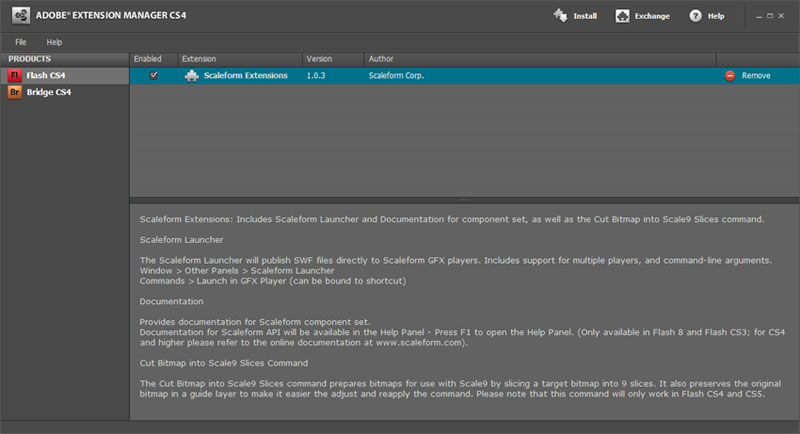
- The Scaleform GFx Launcher is now displayed in the Adobe Extension Manager dialog.
- Restart Adobe Flash Professional CS4, close Extension Manager.
- Navigate to Window > Other Panels, choose Scaleform Launcher.
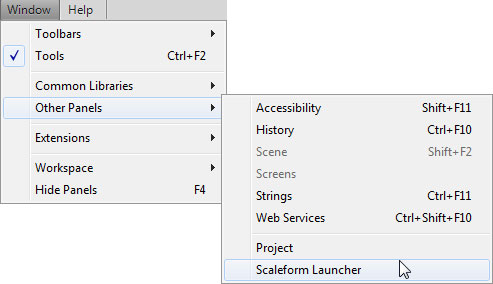
- The Scaleform Launcher panel is now displayed.
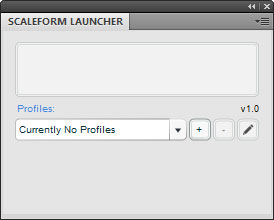
Setting up Scaleform GFx Launcher
The Scaleform Launcher needs to be set up to point to the GFx player, so CLIK widgets and their functionality is accessible to preview within Adobe Flash Professional.
- Click the
 button to add a new Profile.
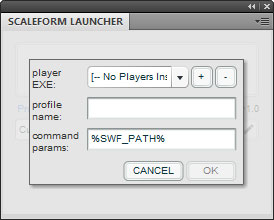
- The GFx player needs to be referenced. Click the button to add a player.
- Navigate to
[UE3Directory]\Binaries\GFx. - Select
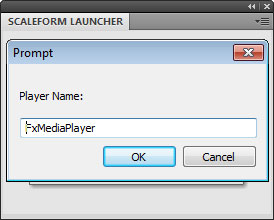
FxMediaPlayer.exe. NOTE: if you're warned the scripts are running slowly, choose NO. This is a known issue, and Scaleform is fixing it in a future release. - Name the player FxMediaPlayer.
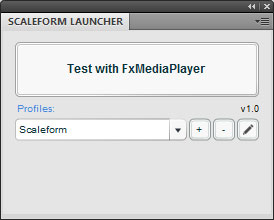
- You can name the profile using the Profile Name field.
Note: The default Adobe Flash Professional renderer will stay intact, to preview the SWF from the GFxPlayer, you need to press the big "Test with ..." button on the Scaleform Launcher panel.
You can also create another profile, that uses the FxMediaPlayerNoDebug.exe player if you wish. This player will not report loading of instances in the console, and will instead only spit out trace commands within your ActionScript.
Setting Up Additional Profiles For Split Screen Previewing
To accurately test the UI's positioning and scaling for standard definition, and split screen screen resolutions, you can set up multiple profiles based on the previous steps to have the GFx Player preview window start at a specific resolution.
- Once you have a player set up, in the Scaleform Launcher panel click the button.
- Name the profile SD.
- In the command params text field, after
%SWF PATH%add the text-res 960:720. - Click OK to save.
- NOTE After you hit Launch, the movie will be scaled to fit the view port. Press Ctrl + D on the keyboard to make it fill the player.
Installing CLIK library
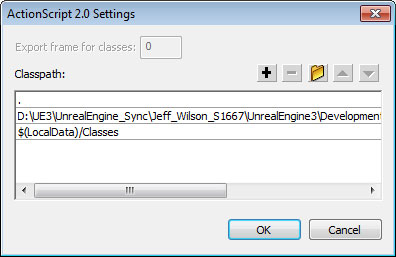
ActionScript 2 / Scaleform 3
- Within Adobe Flash Professional CS4, go to Edit > Preferences.
- Choose ActionScript.
- Click the
 button.
 - Add a new entry with the
 button.
 - Set path to the CLIK directory (for example:
[UE3Directory]\Development\Flash\AS2\CLIK).  Make sure that the path you added is second from the top (see image below)!
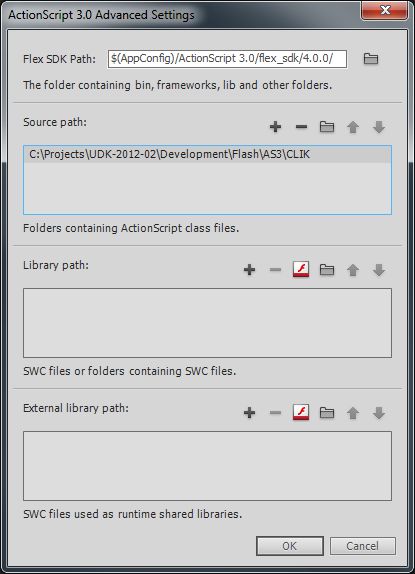
ActionScript 3 / Scaleform 4
- Within Adobe Flash Professional CS5.5, go to Edit > Preferences.
- Choose ActionScript.
- Click the
 button.
 - Add a new entry with the button in the Source path section.
- Set path to the CLIK directory (for example:
[UE3Directory]\Development\Flash\AS3\CLIK) - see below.
Coding Environments
In addition to the built-in Flash ActionScript editor, there are other coding environments that can be used. A couple are listed below:
'OLD POSTS' 카테고리의 다른 글
| UDK Scaleform CLIK Tutorial (0) | 2012.12.05 |
|---|---|
| Custom Menu In UDK (scaleform) Tutorial (0) | 2012.12.04 |
| UDK 카메라 시점 변환 관련 (0) | 2012.12.02 |
| Perforce Server 유저 자동 생성 막기 (0) | 2012.11.28 |
| unrealscript mobile previewer debugging (0) | 2012.11.28 |
UDK 카메라 시점 변환 관련


UDK 의 카메라 시점 변환을 할려고 할때 (1인칭에서 3인칭 모드로 바꾼다거나)
PlayCameraAnimation(target, 5);
이런걸 기대를 많이 했으나.
그딴거 없고 전부 클래스로 만들어서 PlayerTick 에서 카메라값 계산 해서 때려넣는다..
요술봉 따윈 없는거다.
'OLD POSTS' 카테고리의 다른 글
| Custom Menu In UDK (scaleform) Tutorial (0) | 2012.12.04 |
|---|---|
| UDK Scaleform 개발을 위한 Flash 환경 설정 (0) | 2012.12.04 |
| Perforce Server 유저 자동 생성 막기 (0) | 2012.11.28 |
| unrealscript mobile previewer debugging (0) | 2012.11.28 |
| 2012년 11월 UDK 릴리즈 노트 중에서. (0) | 2012.11.28 |